 |
|
Call Us:
1-877-744-1221
|
Browse Submit a Ticket |
This guide explains how to update KMP to a newer version. Please note that this guide is useful for everyone who hosts KMP themselves. If your knowledge base is hosted by us - you do not need to update KMP, we will do this for you soon after new update is released. Each version of KMP may include some major updates that can affect behavior and look of the application. Please check the subsequent update notices prior to updating. For example if you're upgrading from v5.3.1 to v6.0.2, you need to check update notices for v5.4, v6.0, v6.0.1, and v6.0.2. To start updating log in to your KMP admin panel first.
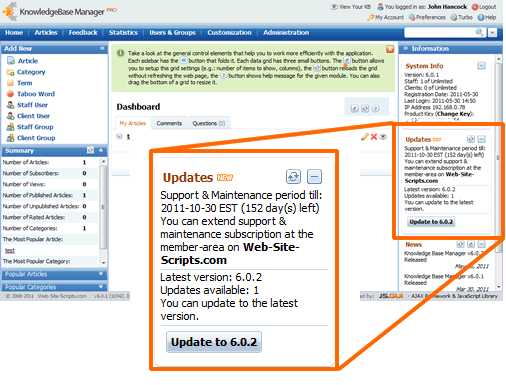
You will see that the Updates module suggests you to update to the latest version. If you do not see this panel, it is probably turned off. If you've got a message that says that update server is not available, you can troubleshoot this problem. Please read carefully and follow the update instructions below in order to minimize possible issues during and after update.
Memory Limit
Please check the memory_limit option in PHP settings (php.ini). If memory limit is low (less than 32M), update may fail. We recommend to set it to 128M or -1 (unlimited):
memory_limit = 128M
or (recommended):
memory_limit = -1 Restart the web server after changing this option to apply the new value. It is also highly recommended to setup other PHP timeouts and limits as specified here. Create file and database backups
Backup all KnowledgeBase Manager Pro files and make MySQL dump of its database via Control Panel or command shell, and store them in a secure location. If anything would go wrong during the update process, these backups are your only way to restore your knowledge base. Check connection with LDAP server
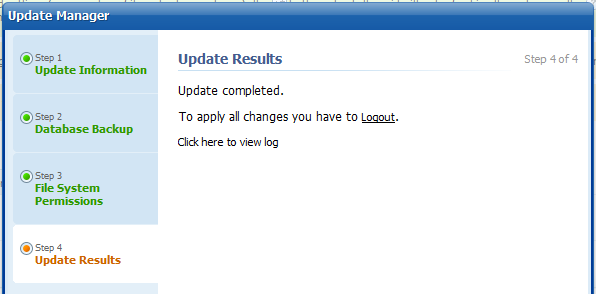
If you're using integration with LDAP server, make sure that LDAP server is accessible by KMP and correct LDAP connection details are specified. Otherwise group mapping may be be lost and users imported from LDAP server won't be able to login after update - you would need to import them anew. When you've finished all preparations, click on the "Update to …" button. Step 1 of 4: Update InformationFirst wizard page shows general information about the update. After you hit "Next", updater will download the latest update packages. It might take several minutes. Step 2 of 4: Database BackupThis is your last chance to create a backup of your database before starting update process. There is a "Backup" button on this page, but we strongly recommend also backup the database as described above because this button makes only the database backup, but it doesn't back-up your attachments and images. Step 3 of 4: File System PermissionsOn this step Update Wizard checks file system permissions and required modules. It will show you the list of files and directories that need write permissions. Usually there are many files that need write permissions, so it is better to setup permissions to all files at once recursively. This guide help with setting file permissions during and after update. Press "Next" to start updating process. It might take several minutes. Step 4 of 4: Update ResultsIf update has been successful, you will see this message.
You can click on the "Click here to view log" and scroll the log down - you should see the "Update successful." message at the bottom. After successful update you must relogin in order to finish the update. Click the "Logout" link to log off. You may need to go through the update process several times in a row to apply the latest updates (for instance, if you're updating from v6.0 to v6.0.2, you would need to go through the update wizard twice). If update has been failed
If update process has been unsuccessful for some reason and KnowledgeBase Manager Pro does not longer work, contact our support department for help and attach the update log file \admin\update_pool\log\log.txt. Please note that if update failed and you restore files and database to the pre-update state, you must drop (delete) all tables in the KMP database first before restoring it. Otherwise update will surely fail next time while trying to create tables and columns that already exist! Post Update ActionsThat's all and you are done with update! Update file and folder access permissions.Please press Ctrl-F5 (or Ctrl-R in Safari) in your browser after you login to KMP after update to make sure that your browser doesn't load old images and scripts from its cache. |
|
|
| FAQ Manager by: KnowledgeBase Manager Pro v6.2.2 (Built with: JS.GUI - JavaScript Framework) |


