Online Chat
 Call Us: 
1-877-744-1221
Browse Submit a Ticket
 
Advanced Search
Tools
Rss Categories

Single sign-on (SSO)

Author: Edward Hardin Reference Number: AA-00624 Views: 31870 Last Updated: 09/01/2016 03:22 PM 0 Rating/ Voters

With SSO user just needs to login once to your website or other application and he immediately and automatically gets authenticated to Knowledgebase Manager Pro.

To integrate your application or website with KMP via SSO, follow this guide.

Please note that the SSO feature does not get user credentials automatically from Active Directory or Windows session.

SSO Settings

First of all, you need to enable and configure SSO in KMP settings.

To do this, go to Customization > Styling and Front-end Settings > Access, and scroll down to the "Single Sign-On" group of settings:


Enable SSO here by setting the "Enable SSO" checkbox.

SSO makes user, who's logged into your system, authenticated to your knowledge base. But, what if they go directly to your knowledge base before logging into your system? You can handle this by setting a remote login URL where your users will be sent when they arrive at KMP not logged in. The "Direct Login Redirect" option is being used for this case. It should contain the URL of the login page on your website or application which would be the entry point for your users (users will use their logins and passwords to login there, and then they would be automatically logged in to KMP by SSO). It is required field and you must specify it before saving current settings. User will be redirected to this page if he clicks the login link in KMP. Warning! Do not put URL to KMP login page here! It would be completely incorrect and lead to redirect loops! 

Here you can also change the following options.

  • Auto Creation of New Users - If a user who tries to login via SSO doesn't have an account in KMP yet, new account will be created automatically for him, if this option is enabled. Otherwise, he won't be able to login to KMP unless you create an account for him manually. It it recommended to enable this option, so that you wouldn't need to create user accounts manually.
  • Default SSO Assignee Groups - if you have enabled the previous option, this one defines to which group(s) you would like to assign new users by default. If you pass group IDs via SSO request, value of this setting will be overridden.
  • Save Logs - this option enables saving SSO logs. You can view them at Administration > Logs > Single Sign On.
  • SSO URL, Account Key, and SSO Key - are values generated by KMP. You will use them during setup of SSO integration later.

SSO Integration

Configuring the Sample Script

KMP comes with a simple PHP example that shows how SSO works. You can download it at the bottom of this page. It consists of three files:

  • simple_example.php - the SSO script itself.
  • inc/sso.utils.php - helper functions for data encryption and authentication token generation.
  • rijndael.php - "mcrypt" PHP library is used for request encoding, and if it is not available, this script is used instead.

Upload the /examples/sso/ folder to a web server with PHP support. This could be a remote server in relation to the server where KMP installed. Please do not upload it a sub-folder of KMP, it won't work!

Edit the simple_sample.php file and follow the instructions provided by the inline comments. Briefly, you just need to copy paste SSO URL, Account Key, and SSO Key from SSO settings in KMP to this script.

Run this script by opening its URL in your browser. You will be provided with a login link. Click on it to login to KMP.

If you would like to login user automatically, without asking them to click the login link, you can display a 1px*1px image on the page which is shown to user after login. Use the same URL for "src" parameter of the image. 

// Result handler
if ($result[0] == 'authorization_successful') {
    // Show login link if authentication has been successful. User must click on this link to authenticate.
    // echo 'Authorization successful. <a href="' . KMP_URL . 'SSOAuth/' . $token . '" target="_blank">Go to KMP</a>';
    // Alternatively you can login user automatically by showing a 1x1 px image on the page shown after login.
    echo '<img src="' . KMP_URL . 'SSOAuth/' . $token . '" width="1" height="1" />';
} else {
    echo 'Authorization failed. Error: ' . $check_result;
}

Please note that in this case users who are using Internet Explorer, might need to add the website with SSO script to exceptions (if SSO script and KMP are running on different domains).

From the Sample Script to the Real Case

Now that you've got a working sample script, you can integrate it to your website or portal. Surely you do not need the sample script itself as a separate file, but you have to copy its contents (everything that goes between <?php and ?> tags) to the place on your portal, where you wish a user to be logged in automatically (either after a click, or immediately). Usually it should be the page, which is displayed to the user after he logs in to your portal. Also you would need the other two files (sso.utils.php and rijndael.php).

There are just a few things you need to modify.

There is $user_data array within the sample script. We define a sample user account details here. In the sample script they are hardcoded, but in a real situation you'll need to pass actual user details to it.

$user_data = array(
    'login'      => 'user-login',
    'first_name' => 'Firstname',
    'last_name'  => 'Lastname',
    'email'      => 'user@email.com',
    'groups'     => array(8, 5)
);

The "login" is always required. Password is not used, the SSO key is passed to KMP for authentication instead.

The "first name", "last name", "email", and "groups" are required only if the user doesn't exist in KMP yet, so these details would be needed to setup an account for him. They also can be used to update the user account details in KMP. For example, if a user's email has been changed in your system, the next time you log him in via SSO you can pass the new email via this array and it will be updated in his account details in KMP. You might want to pass these details each time a user logs in, so that his account in KMP would be always up to date. If a parameter is empty, then it will not be changed in user's profile in KMP. To sum up, there parameters are optional, but it is a good idea to pass them each time user logs in just to keep his account up-to-date.

The "groups" parameter is another array, which can be empty...

'groups' => array()

...or may hold one or multiple group IDs separated by commas.

'groups' => array(7, 9, 12)

If at least one group ID is specified, user will be assigned to that group or groups upon login. Please note that user will be unassigned from any other groups in this case, i.e. he will be unassigned from all groups he belonged to, and then assigned to the groups specified by this parameter.

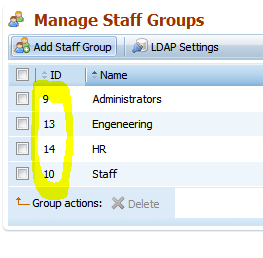
To find out how groups and their IDs match, simply go to Groups & Users > Staff > Manage Staff (or Groups & Users > Clients > Manage Clients) page and you will see group IDs in the first column.

Another thing that you may wish to change is the text of the link, which points to KMP (highlighted below).

echo 'Authorization successful. <a href="' . KMP_URL . 'SSOAuth/' . $token . '" target="_blank">Go to KMP</a>';

If a login attempt fails in the sample script, it returns the error to the screen.

Preformatted content box is designed for insertion of preformatted text like quotation or source code.

You might want to write errors to a log file, instead.

That's all. If you would need any help or have some questions, feel free to contact our support.

Attachments
sso.zip 15.6 Kb Download File